Painting the Elf was a bit of an experiment for me as I really was not thrilled with the colors chosen for the character in the artwork. So instead of following the artwork, I decided to completely take the elf colors in a different direction. Here is my take on the Hero Quest Elf.
Colors
For the colors on the elf I used the following:
- Primer – Zenithal Prime with Black, Grey Seer, and Wraith Bone
- Skin – Citadel Contrast Apothecary White
- Hair – Citadel Contrast Skeleton Horde
- Leather work (Belts, straps, pouches) Citadel Contrast Snake Bite Leather
- Potion vials on belt – Citadel Contrast Talassar Blue, Blood Angels Red, and Magos Purple
- Armor and sword blade – Citadel Lead Belcher base with a coat of Citadel Contrast Plague-Bearer Flesh
- Cape, sword hilt, and accents – Citadel Retribution Armor
- Tunic – Citadel Contrast Creed Camo and Retribution Armor
- Washes – Agrax Earthshade and Nuln Oil
- Mini Base – Vallejo Model Black
- Protective – Testos Dull Cote
Application
When working with Citadel contrast paints it is best to paint from light areas to dark areas and have a pot of wraith bone handy if you need to make any touch ups. Here are the steps I used to paint the elf.
- Start by applying a 3 step zenithal primer to the elf using the black, grey seer, then wraith bone spray primers. This helps bring out the shadows in the mini. For instructions on how to apply a zenithal primer check out this article.
- Start with the apothecary white and apply to the face, ears, and hands of the elf. We will be applying some wash later to make the skin pop a bit more.
- Using the skeleton horde, paint the hair of the elf. Nothing crazy here.
- Now using snakebite leather paint the leather work on the elf. He has a belt, several satchels, the underside of his gauntlets, you can even do the feet, and a potion holder that should be painted in this color.
- Paint the vials on his belt with talassar blue, blood angels red, and magos purple. In hindsight, I would have chose something different than purple but the red and blue really pop.
- Paint the cloth between his legs creed camo, we will be coming back to that with some retribution armor on the scroll work.
- Time for the armor. Paint the armor including the shoulder pads, chest-piece, plates on the arms and legs, shield, and chain mail in lead belcher. The blade on the sword can be done at this point too.
- I wanted to give the armor an elven steel look, LoTR style. To do this I went over the blade, chest-peice, shoulder plates, and plates on arms and legs with plague bearer flesh (don’t paint the chain mail and shield here). Because the contrast paint is somewhat transparent, you get this green metallic look. Mythical!
- Paint the sword hilt, cape, head band, and the insignia on the chest piece with retribution armor. For the scroll work on the tunic, lightly brush retribution armor on the raised part so that you still have green in the recesses. Do this for the scroll and edges.
- Shades. For the hair, leather work, and gold parts I shaded with agrax earthshade. For the chain mail, blade, armor, and skin, I used nuln oil.
- Base with vallejo black paint. This paint goes on best when watering it down and a little goes a long way! I find the best way to apply is to put a drop of paint on the paint pallet and just dip the tip of the brush lightly in water then pull a bit of paint from the pallet. That should give you enough to cover the base and if you need more just dip in water and pull paint from pallet again until base is complete.
- Once dry spray with dull cote for protection.
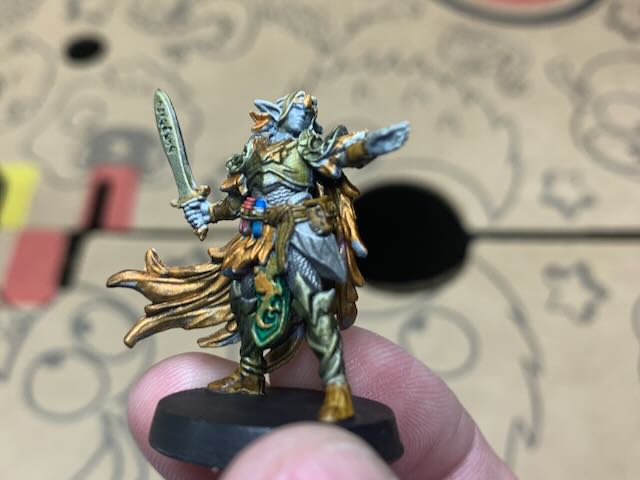
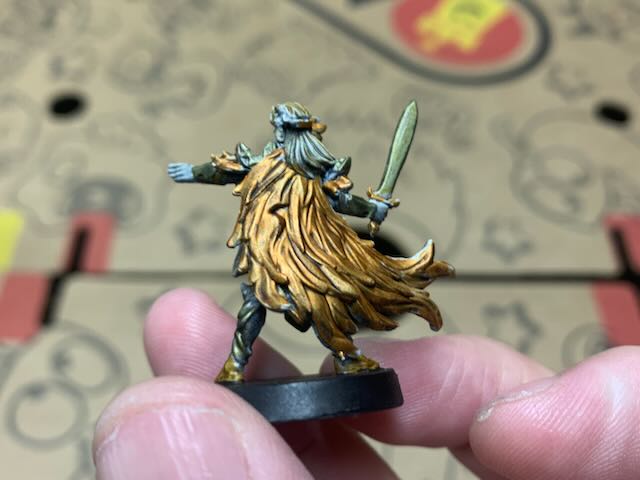
There he is in all his glory! Even if you don’t follow what I did, I hope this gives you some ideas of some alternative color layouts for the elf.
I have also made a video outlining the elf painting below.


Leave a Comment